Or: How I Learned to Stop Worrying and Love the Variance Threshold
Introduction: When Beauty Meets Technology
The challenge seems straightforward: analyze a photograph and determine whether someone's skin has warm (yellow-based), cool (pink-based), or neutral undertones. Beauty professionals do this intuitively in seconds. How hard could it be to teach a computer the same skill?

Turns out, very hard. This is the kind of problem that looks simple in theory but reveals layer after layer of complexity when you encounter real-world images. You'll deal with mixed lighting, makeup, shadows, phone cameras, and the fundamental messiness of reality versus textbook examples.
What follows is the story of building a skin undertone detection system that actually works on real photos. You'll learn about color science, how computers "see" skin tones, why human perception matters more than RGB values, and how to handle the inevitable edge cases that break your perfect algorithm.
The good news: it works. The system can analyze smartphone photos taken in everyday conditions and produce reliable undertone classifications. That's the real achievement—not perfect code, but something that succeeds in the messy real world.
LAB Color Space: The Secret to Seeing Like Humans
Before we can detect anything, we need to understand how to represent skin color in a way that mirrors human perception. This is where LAB color space becomes the game-changer.
Understanding LAB Color Space
LAB is designed to match human vision, not computer screens
Controls brightness from dark to light
Higher a* = more pink undertones
Higher b* = more yellow undertones
- Warm: b* > a* (more yellow than pink)
- Cool: a* > b* (more pink than yellow)
- Neutral: a* ≈ b* (balanced)
Unlike RGB (designed for display screens) or HSV (intuitive but inconsistent), LAB is perceptually uniform. This means equal numerical changes correspond to equal perceived color differences to the human eye. When detecting subtle undertone differences, this property is invaluable.
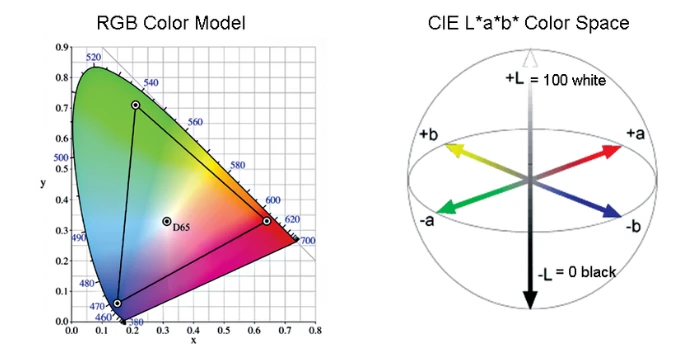
RGB vs LAB: How different color spaces represent the same face
The Three Undertones Explained
b* > a* in LAB space
Skin has golden, peachy, or yellow cast. Gold jewelry typically flatters more than silver.
a* > b* in LAB space
Skin has pink, red, or bluish cast. Silver jewelry typically flatters more than gold.
a* ≈ b* in LAB space
Skin has balanced mix of warm and cool. Both gold and silver jewelry look good.
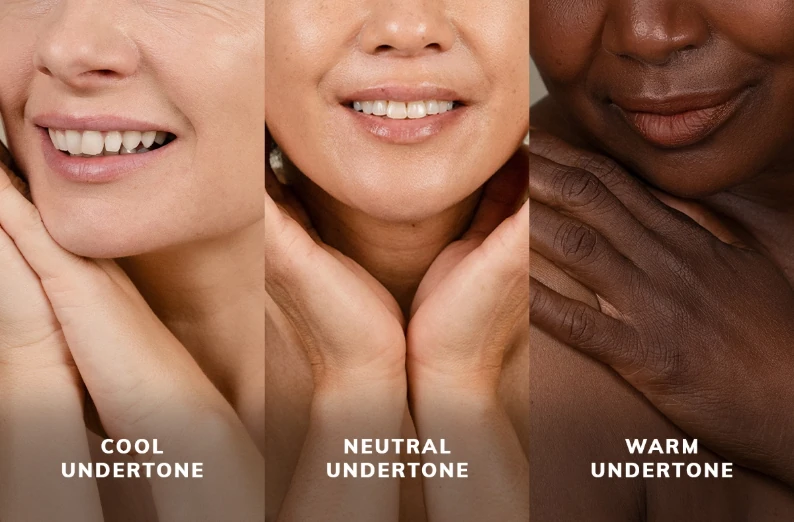
Visual comparison of warm, cool, and neutral undertones in real skin
How the System Works
Now that we understand the color science, let's look at how the system analyzes a photo. The process follows a logical pipeline: detect the face, isolate skin regions, analyze multiple patches, and make a final decision based on all the data.
The Detection Pipeline
Find facial landmarks using computer vision
Exclude eyes, lips, eyebrows - just skin
Sample 40+ regions across the face
Convert to LAB, compare a* vs b*
Aggregate results with confidence score
The Architecture Details
Each step in the pipeline handles specific challenges. Let's explore what makes this work in practice.
1. Face Detection
The system uses MediaPipe, a computer vision tool that identifies 468 facial landmarks with impressive accuracy. Think of landmarks as precise GPS coordinates on the face—corners of eyes, nose tip, jawline points, etc. These landmarks tell us exactly where the skin is located.
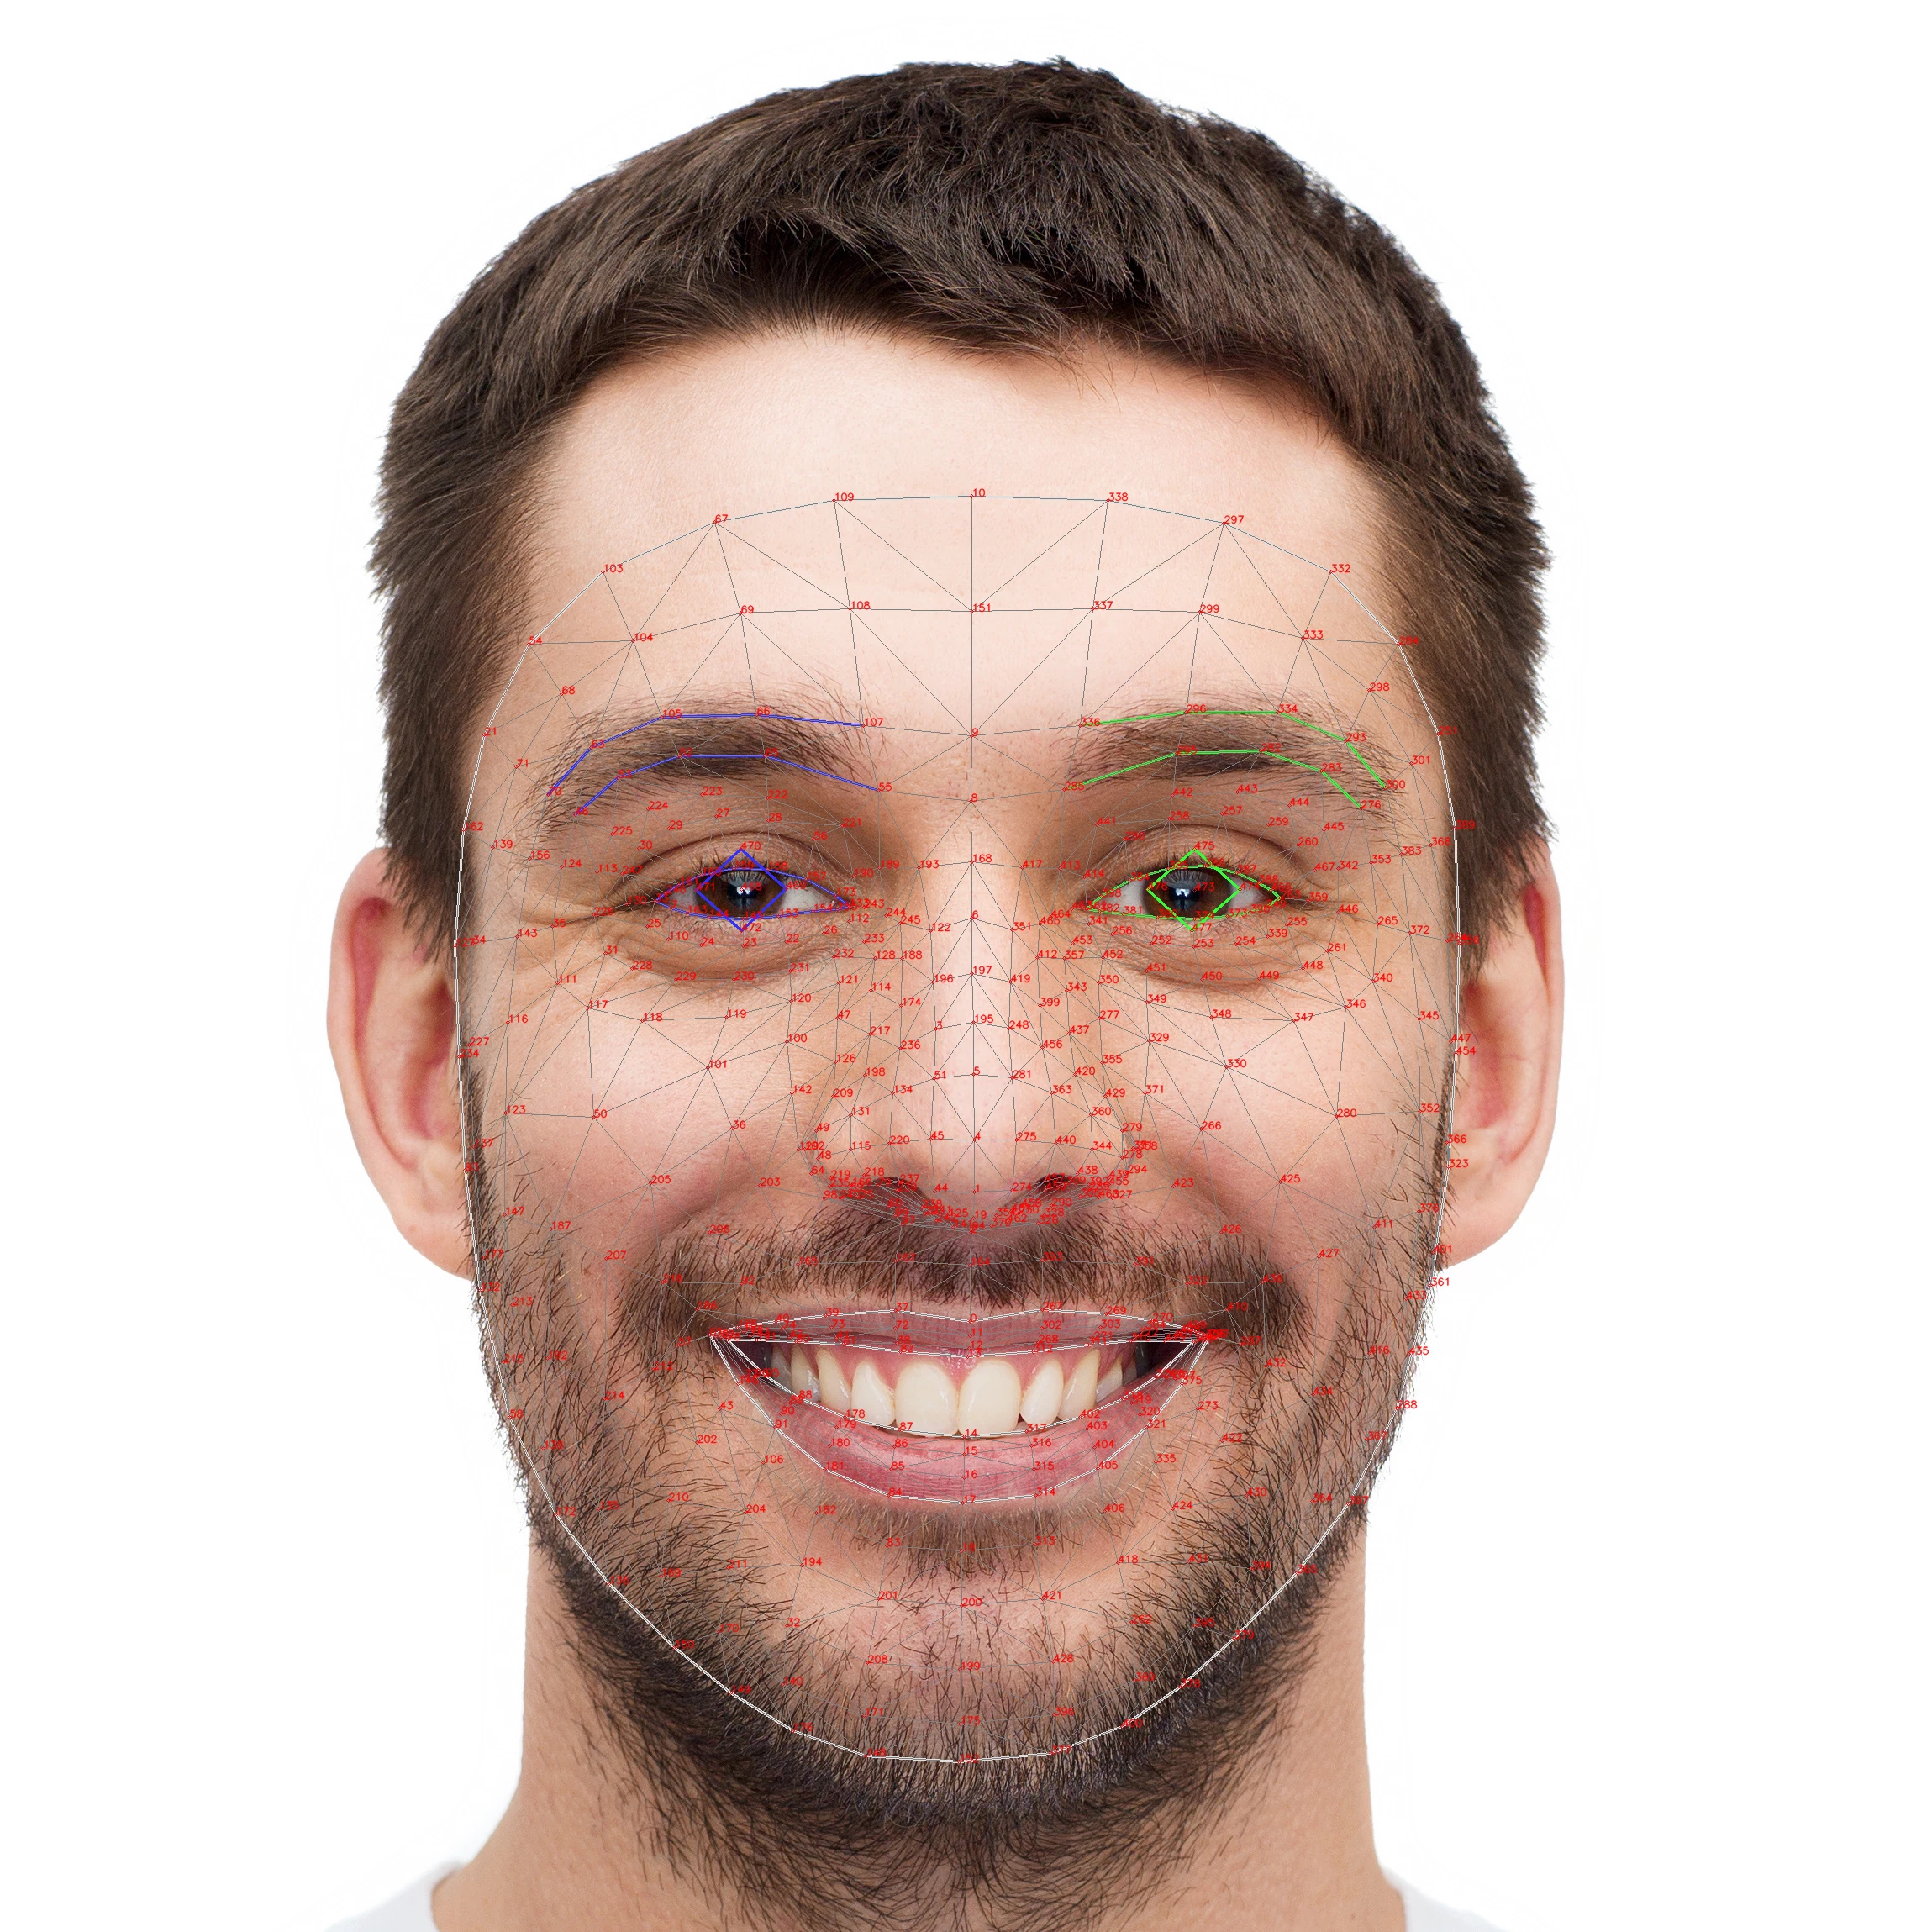
MediaPipe's 468 facial landmarks provide precise coordinates for skin analysis
2. Creating the Skin Mask
Once we have the landmarks, we create a "mask" that isolates just the skin. This is crucial—we need to exclude eyes, lips, and eyebrows because makeup on these features would completely throw off undertone detection. The mask is like a stencil that says "analyze here, but not there."
3. Sampling Multiple Regions
Here's where it gets interesting. Instead of looking at just one spot on the face, the system samples 40+ different patches from various regions. Why so many?
- Lighting varies across the face (shadows, highlights)
- Skin tone isn't uniform (cheeks may be rosier than forehead)
- Makeup distribution differs by region
- Errors happen in individual measurements
Not all regions are equal. The system prioritizes:
- Jawline/neck: Most reliable, typically less makeup
- Forehead: Usually consistent lighting
- Cheeks: Good data but may have natural flush
- Temples: Smaller areas, may have shadows
By analyzing many patches and voting on the results, the system becomes robust to individual bad measurements. It's the wisdom of crowds applied to skin tone detection.
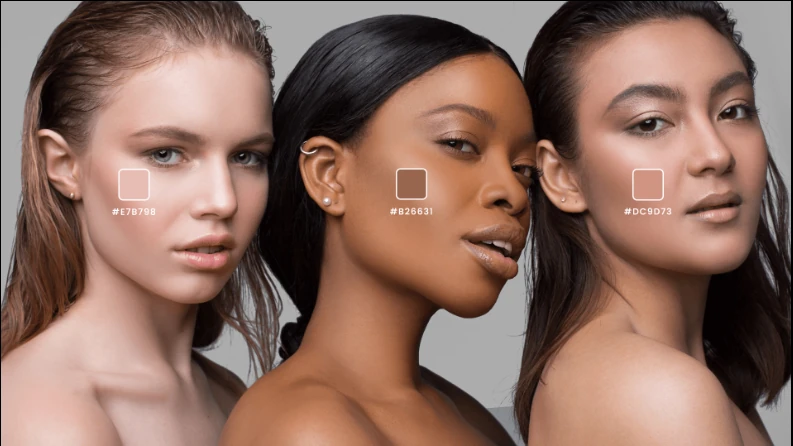
Multiple patches sampled across different facial regions for robust undertone classification
4. Filtering and Quality Control
Not all patches are created equal. Some might include shadows, reflections, or problematic lighting. The system needs to separate good data from bad data.
The Progressive Filtering Approach
The system uses a smart filtering strategy that tries to maintain high standards but gracefully degrades when necessary:
- First attempt: Look for pixels that perfectly match expected skin tone ranges in LAB space
- If that fails: Gradually relax the criteria—maybe the lighting was weird, maybe there's a color cast
- Still failing?: Try alternative detection methods (HSV color space can work when LAB struggles)
- Last resort: Accept that this is a challenging image and work with whatever data is available
Each patch also gets a "consistency score" based on how uniform its color is. A patch where all pixels are similar is more trustworthy than one with wild variation. The system tracks which patches meet high standards vs. which required fallback methods.
5. Visual Debugging: Seeing What the System Sees
One of the most valuable features is the ability to see exactly what the algorithm analyzed and why it reached its decision. The system generates annotated images showing all its work.
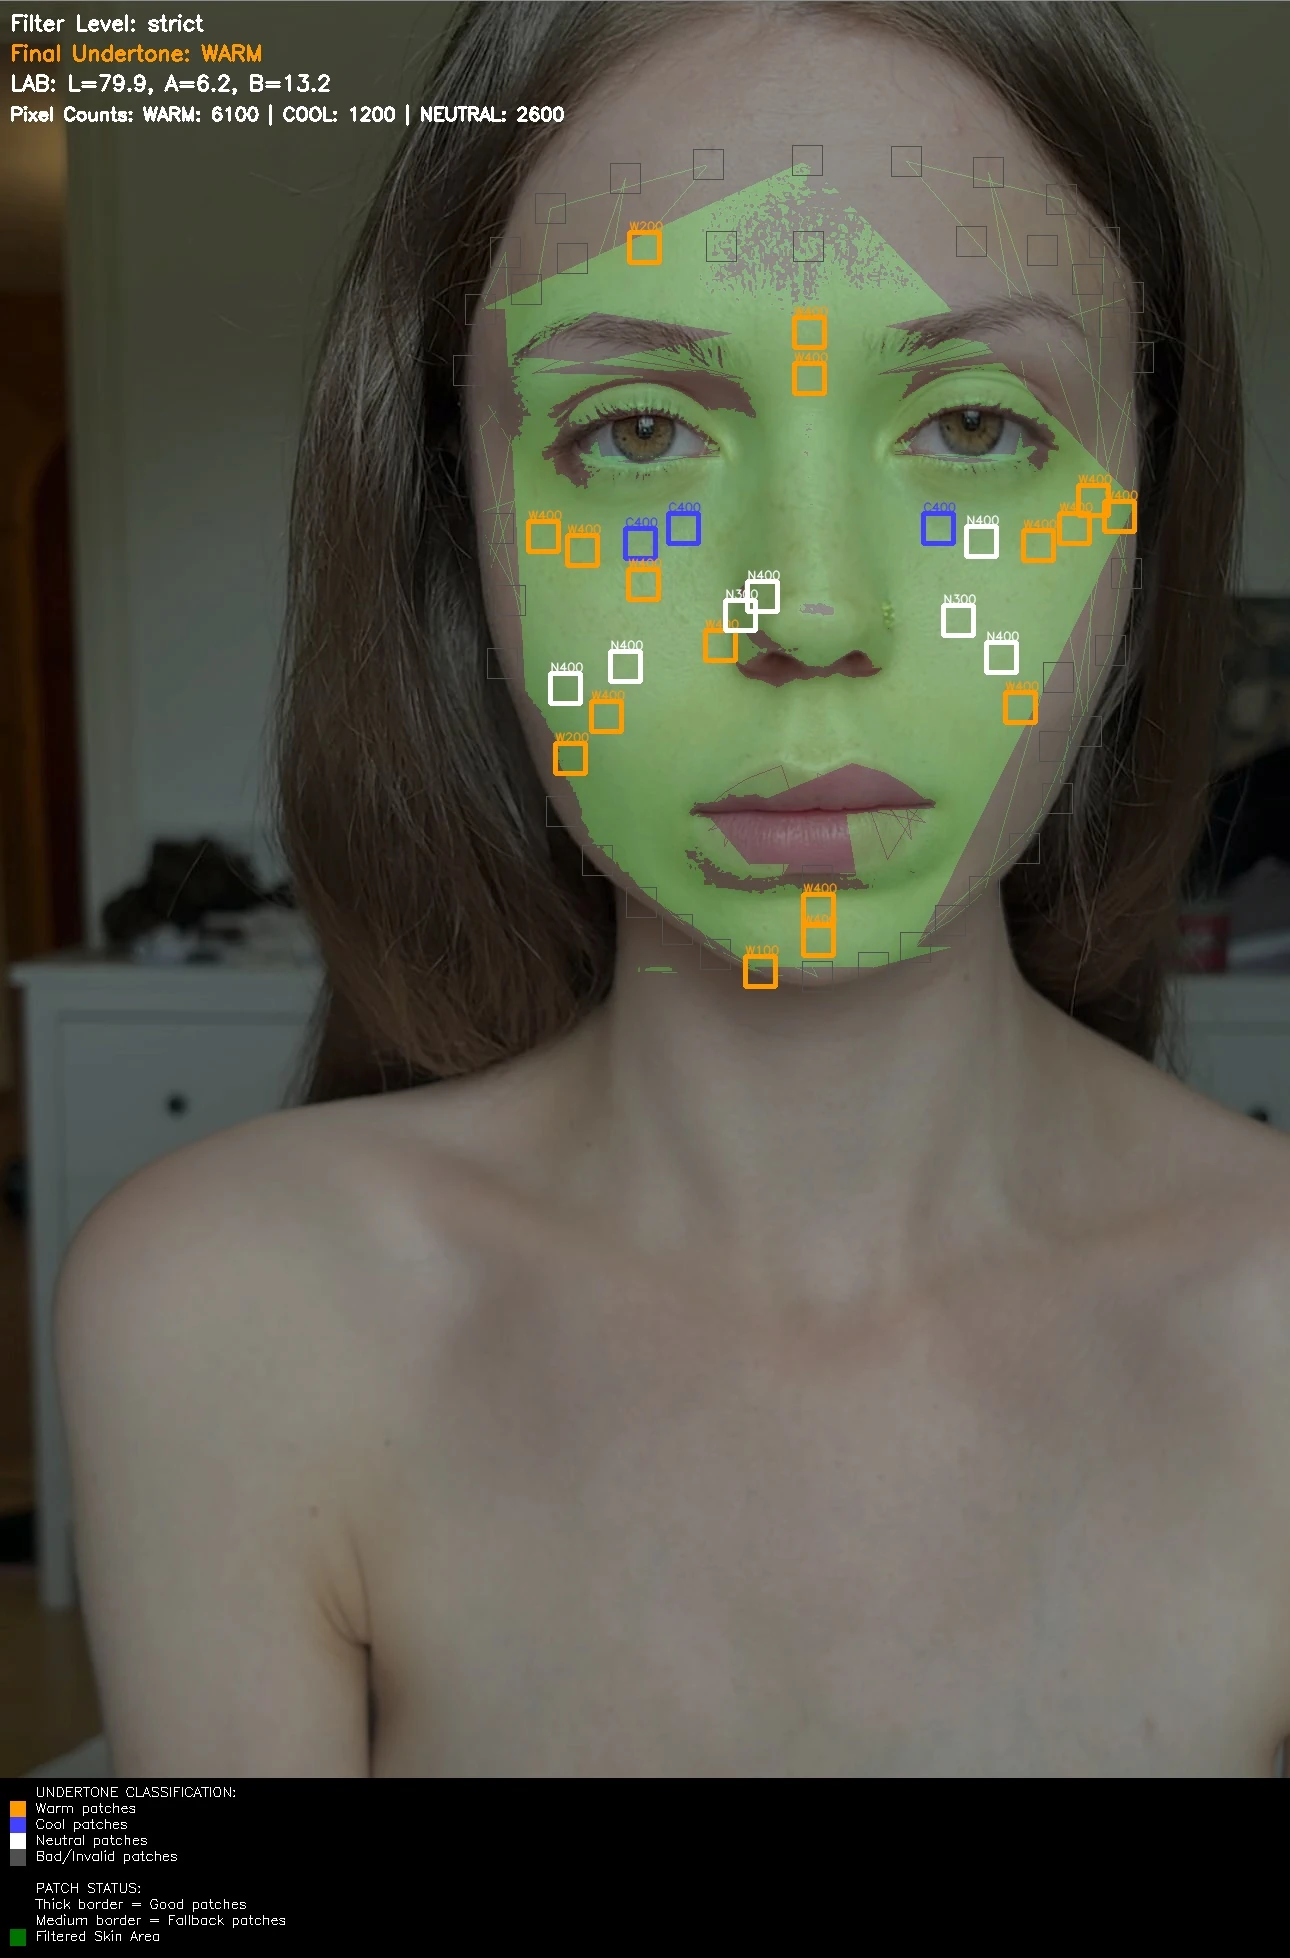
Debug output showing patch classifications, skin mask, and analysis statistics
Reading the Debug Visualization
The annotated images show several key elements:
- Colored rectangles: Each patch analyzed gets a colored border
- Orange = warm undertone detected
- Blue/red = cool undertone detected
- White = neutral undertone detected
- Gray = rejected (quality issues)
- Border thickness: Thicker borders indicate higher quality/confidence patches
- Green overlay: Shows the masked skin region being analyzed (excluding eyes, lips, eyebrows)
- Text annotations: Display statistics like final classification, confidence scores, and patch counts
These visualizations make the black box transparent. If the result seems wrong, you can see exactly what happened—maybe makeup skewed the cheek patches, or shadows affected the jawline, or the person is genuinely borderline between categories.
6. Making the Final Decision
After analyzing 40+ patches, the system has a lot of data. Now it needs to make a single decision: warm, cool, or neutral?
The Voting System
Think of it as a democratic process where each good-quality patch gets to vote based on how many pixels it contains. Patches with more pixels carry more weight.
- Count the votes: Add up all pixels classified as warm, cool, and neutral
- The winner: Whichever category has the most pixels wins
- Tiebreaker: If it's close, look at consistency—patches with less variance are more trustworthy
Confidence Scoring
Every result comes with a confidence score that tells you how certain the classification is:
- High confidence (80-100%): Clear, consistent undertone with large separation between a* and b* values
- Medium confidence (60-80%): Undertone is present but not dramatic
- Lower confidence (<60%): Borderline case, challenging lighting, or truly neutral undertone
This confidence score is valuable because undertones exist on a spectrum. Not everyone is clearly warm or cool—some people are subtly warm, or borderline neutral-cool.
Key Takeaways
Real-World Images Are Messy
Color theory textbooks show perfectly lit spheres with uniform surfaces. Real faces have shadows, highlights, uneven makeup, skin texture, clothing reflections, and mixed lighting. A system designed only for perfect conditions fails spectacularly on actual smartphone photos. This is why the system needs multiple fallback strategies and flexible thresholds.
Visualization Is Crucial
The annotated debug images were essential for development and remain valuable for understanding results. When numbers don't make sense, seeing the actual analyzed pixels provides immediate clarity. This transforms an opaque algorithm into something transparent and debuggable.
"Good Enough" Often Beats "Theoretically Perfect"
Perfect undertone detection is impossible—even human experts disagree on borderline cases. A system achieving 85-90% accuracy on real-world images is genuinely useful. The goal isn't replacing human judgment but providing a data-driven starting point. Sometimes pragmatic solutions that handle edge cases beat elegant solutions that only work in ideal conditions.
Graceful Failure Matters
Some images simply can't be analyzed: extreme low resolution, heavy Instagram filters, poor lighting, or unusual face angles. The system recognizes these cases and returns clear error messages rather than fabricating unreliable results. Knowing when to give up is as important as knowing how to succeed.
The Spectrum Reality
Undertones aren't binary. People exist on a spectrum from clearly warm through neutral to clearly cool. The confidence scoring acknowledges this reality—not everyone fits neatly into categories, and that's perfectly normal.
Conclusion: Making It Work in the Real World
Building a skin undertone detection system that works on actual smartphone photos is surprisingly complex. The theory is simple—compare yellow vs. pink in LAB color space. But reality involves shadows, makeup, mixed lighting, phone cameras, and the fundamental messiness of real-world images.
The system described here works through a combination of solid color science foundations (LAB space), robust sampling strategies (40+ patches), progressive filtering (graceful degradation), and transparent feedback (visual debugging). It's not perfect, but it achieves 85-90% accuracy on real-world images, which makes it genuinely useful.

Successful undertone detection with detailed analysis overlay and confidence metrics
The real achievement isn't elegant code or mathematical purity—it's building something that succeeds when faced with the complicated, beautiful reality of human faces in everyday photos. Computer vision in the real world is about balancing accuracy with robustness, handling edge cases gracefully, and knowing when to relax your standards.
Future improvements could include machine learning models, better lighting normalization, video analysis, and user feedback loops. But the current system proves that thoughtful rule-based approaches can work remarkably well when designed with real-world challenges in mind.